Monday, July 31, 2023

Creative Elements Christmas

Stampin' Up!'s Creative Elements is one of my favorite sets. I especially love this flower because it's a perfect combination of a stamp that's outlined, yet solid enough to be appreciated without being colored in. I love the other elements in the set as well.

A couple of days ago I did a challenge card for Retro Rubber, and I had this card base and a few of the flowers leftover. I made this card, which is almost identical to the first one, but with a few improvements. I like the patterned paper better on this, and th ribbon and placement of the flowers hides a lot of flaws in the gold stenciling.

It's always good to have extra Christmas cards on hand, so I'm glad I've made this one. The months fly by so quickly, December will be here before we know it!

Sunday, July 30, 2023

Freshly Made Sketches #596

Judy over at Freshly Made Sketches has created such a clever design. It's simply to leave the bottom half of the card plain and decorate only the top part. So simple and yet so fun! (FMS596)

I chose to use a new stencil that I bought this summer. I wanted to ink it up before I played around with using fabric paint on it, as I'm not sure how easy it will be to clean after that. It took a couple of tries, but I got a pretty good image.

Stenciling is so much fun, but there is an art to it. I think having good quality paper is key. I used Michael's 110# card stock, and while that's usually a good choice, for stenciling I think the fibers showed through just a bit more than I would like. I do have some Stampin' Up! Whisper White that I'll try next time. But since it's less than 24 hours before this challenge ends, I'm sticking with my finished card. 

My complete supply list is:

  • Pink & Main Poinsettia Stencil
  • White Card Stock
  • Stampin' Up! Poppy Parade Ink & Card Stock
  • SU! Real Red Ink
  • SU! Cucumber Crush Ink
  • SU! Garden Green Ink
  • SU! Pineapple Punch Ink
  • Tsukineko Galaxy Gold Ink
  • SU! Peace & Joy Stamps & Dies

I really like how this card turned out, and I'm so grateful to Judy and everyone over at Freshly Made Sketches for another fun challenge!

Friday, July 28, 2023

Crocheting With Bloom Yarn


One thing I love about shopping at Walmart is the fact that you can pick up a few skeins of yarn along with your groceries. There's just something about some fresh yarn just waiting to be looped into something that someone will love. Such was the case on a recent shopping trip.

Premier's Bloom Yarn has fascinated me since I first saw it at Walmart. It's not only self-striping, but is supposed to make little flowers as you stitch along, as the label shows.

Now I'm a crocheter, not a knitter, so I didn't follow the pattern, but still hoped to get a somewhat similar look with some different stitches. First I tried the circle loom as shown below. I thought this would be my best chance at getting the desired flowers to show up. As you can see, it just looked more speckled than anything. I like the look, but realizing that I'd use up both skeins for just one scarf and still not have what I was hoping for, I abandoned this and just hooked two simple scarves, complete with tassels.

It was fun to give this yarn a try, but I think it will be best when used by those who knit instead of crochet. Still, I have two pretty scarves to give to someone this Christmas!

Tuesday, July 25, 2023

Retro Rubber Tic-Tac-Toe Challenge #211


This card was made especially for Retro Rubber's Challenge #211 (rrcb211). It's a Tic-Tac-Toe challenge that was a lot of fun. I chose the bottom row because patterned paper and twine are two of my favorite things to work with (and I have lots of both). The challenge for me in that row was incorporating stenciling, so I started with that part. 

Using a Tim Holtz Stencil and some Pink & Main Paste I pasted over the stencil directly onto the card then let it dry overnight. In the morning I ran it through the Minc laminator using gold foil. After seeing that, I couldn't help thinking I should turn it into a Christmas Card.The sentiment was the last thing I did, and although it doesn't say "Merry Christmas," the style and size fit. I may end up using it as a birthday or get well card that I send out in December.
My complete supply list is:

Stampin' Up! Floral Essence Stamp Set (2019)
Speckletone True White Card Stock
Tim Holtz Stencil
Graphic 45 Patterned Paper
Generic Green Twine
SU! Garden Green Card Stock
SU! Cherry Cobbler Card Stock
Embossing Powder in Cream & Gold
Sentiment from SU! Blooms & Wishes

It was a fun challenge, as tic-tac-toes usually are. If you'd like to join in the fun any time, visit them over at Retro Rubber and play along!

A different angle shows the gold better!

Saturday, July 22, 2023

Stampin' Up! Extreme Skateboarder

This card was made for a young guy that I read about on the Angel Card Project who loves skateboarding. Making cards for this age group can really be a challenge, but thankfully I was able to pull out this old Stampin' Up! stamp called Extreme Skateboarder. 

I stamped the image 3 times on a 2" x 3" sheet of white card stock. The colors are Night of Navy, Rich Razzleberry and Marina Mist.  It's mounted on a piece of Slate Gray Card Stock from SU! also. 

The sentiment is from Pink & Main.

Looking at the card now, I wish I had used a bit busier background, either with patterned paper or a background stamp. Sometimes I think I'm too afraid to add to much to guy cards for fear they will get too feminine, so maybe it's for the best that it's kind of plain.

I made two of these, as it was almost as easy as making just one. One is going out this week and it will be good to have the other in my stash.

Well that's it for today. Thanks so much for visiting my blog and have a blessed day!

Wednesday, July 19, 2023

Shopping Our Stash #501-No Stamping Allowed

I was saw this challenge when another blogger posted her card. I love the idea of "no stamping allowed," SOS501. And it had been a while since I participated in a challenge over at Shopping Our Stash

The first thing I looked for was a sentiment. I came across these sympathy sentiment strips from Simon Says Stamp. Sympathy cards are so hard to make, and I thought that the sentiment strips would make that task a little lighter.

From there, I grabbed some dies, patterned paper and an embossing folder and came up with this card.

My complete supply list is:

  • Sympathy Sentiment Strips (Simon Says Stamp)
  • Stampin' Up! Forever Flourishing Dies
  • SU! Slate Gray Card Stock
  • SU! Basic Gray Card Stock
  • SU! Cinnamon Cider Card Stock
  • Graphic 45 Dotted Paper
  • SU! Embossing Folder
  • Michaels White & Black Card Stock
  • Spellbinders Circle Dies

This was a really fun card to make, although I know it won't be a fun one to send. It's good to have a stash of sympathy cards on hand however. And I'm glad I was able to make this in advance. 

Thanks to everyone over at Shopping Our Stash for another great challenge!

Monday, July 17, 2023

Circle Loom Knit Scarf (Using Leftovers)

Loom knitting is something that I picked up years ago to pass the time away while I watched TV with the family. I really love having something to keep my hands busy, but I still wanted to be able to carry on a conversation, so some crafts, like cross-stitching, are more difficult to mix with that. Loom knitting was perfect.

I learned from a guy named Mikey over at The Crochet Crowd. His YouTube tutorials are so easy to follow. If you're not familiar with loom knitting, here's a link to his page, Loom Knitting For Beginners.

This scarf was made using leftover Hygge Yarn from Red Heart. In my opinion, it's the best yarn ever! It's soft and fuzzy, just like Hygge should be! They used to carry it at Joann's, but I haven't been able to find it there any more. It may be discontinued, or it may be still available at Red Heart's website. And if you see it at a yard sale, thrift store or on eBay, definitely pick it up. I think you'll really love it!

I started with the brown, but wanted the scarf a little longer, so I came up with the idea of adding cream yarn (the same kind, Hygge) to the end, then making coordinating tassels to make it look like I intended it to look that way.

Scarves are great for Snail Mail gifts, especially around Christmas. Up north so many people could really use one, and they're great because they're "one size fits all." This one I'll probably send out this upcoming holiday season.

All things considered, I really like this one, and I'm hoping someone else will too!

Tuesday, July 11, 2023

Retro Rubber 210 & NBUS Challenge 52 Card

This card was made for a sketch challenge over at Retro Rubber for their 210th Challenge, as well as my NBUS card for July.  

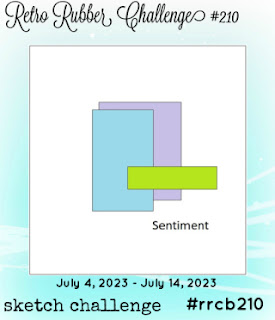
For the sketch challenge at Retro Rubber (RRCB#210), it's kind of a stretch for me. Using bricks as the second block in the back isn't something I usually do, but it seems to fit. And the pot of flowers was used in place of the  long rectangle.

For my NBUS Challenge, this set is a new one to me. I bought it recently when it was on clearance at Stampin' Up! I would have loved to have gotten the dies too, but my budget was better served without making that purchase! But I loved the set enough to buy it alone. It's so unique and really makes a nice addition to my stamp stash.

After making the card, the window wasn't centered, and I didn't want to waste the card base and liner, so I used a Copic marker to make a dark brown line to balance it out and add some accent. I think it makes it look more like it's the corner of a building, so I like that too.

My complete supply list is:

  • Stampin' Up! Welcoming Window Stamp Set (2021)
  • SU! Crumb Cake Card Stock
  • SU! Soft Suede Ink
  • SU! Seaside Spray Ink
  • Memento Potter's Clay Ink
  • Memento Bamboo Leaves Ink
  • Memento Tangelo Ink
  • Brutus Monroe Vanilla Ice Cream Embossing Powder
  • Versa Mark Ink
  • SU! To A Wild Rose (sentiment)

This was a fun card to make. Thanks so much to everyone over at both NBUS and Retro Rubber for encouraging me to pull this one out today!

Wednesday, July 5, 2023

Washi Tape Roll Napkin Rings

After gathering and buying the decorations for my 4th of July table, I realized the one thing I forgot were the napkin rings.

We’re pretty casual eaters, especially since the kids have left home. Sitting in our recliners in front of the TV is the norm for our dinner. Consequently I didn’t have any napkin rings. We didn’t actually need them on the 4th, but I thought it would be nice to give the bandanas some flair. 

I thought about the things I had on hand, and washi tape rolls and jute cording came to mind. I also thought it would fit the Americana look quite well.

The materials are simple:

  • Mini Glue Gun & Glue Sticks
  • Washi Tape Rolls (about 2” wide)
  • Jute Cording
And here’s the really funny thing, the washi tape still has some on each roll and after our dinner, I plan on peeling off the jute, using the washi tape up then glueing it back on! 

From now on I’m saving my washi tape rolls!

STEP 1:

My washi tape rolls were about 1 7/8" wide. This was the perfect size for my napkins, although a bit bigger or smaller may work too. Measure and cut 3 feet of jute per roll.

STEP 2:
I started with a dab of hot glue on the inside of each roll, pressed it down with a paper clip and held it there for a minute to let the glue dry.


STEP 3:
Cut off 2 1/2  to 3 yards of cord per roll. Wrap it around the roll, tightly spacing it on the outside. The inside will be a little bunched up but that's okay.

STEP 4:
End the wrapping by dabbing a bit of hot glue inside the roll again, only this time the glue will be on the jute. Wrap the jute over the glue and hold for another minute. Trim closely on the inside of the roll.

Using napkin rings really made the bandanas fluff out which was perfect for the big placemats.

The napkins make a nice addition to my 4th of July table.

Sunday, July 2, 2023

Cardz 4 Guyz Challenge #325 (Clean & Simple)

If there's one kind of card that I struggle with the most it's Clean and Simple. White space intimidates me! But I do love challenges, and this time over at Cardz 4 Guyz they have a CAS challenge, so I ran with it!

One thing I love about being a card maker is that I never really know what I'm going to end up with when I first start stamping. That's what happened with this card.

I started with the idea of the leaves, but wanted to use my Stampin' Up! Hardwood as a background. Then I remembered that it's a CAS challenge and thought that would look too busy. Still I didn't want to have just a blank space, so I used the background stamp and thought I would stamp it with Versa Mark to give it just a little texture. The Versa Mark barely showed up on the light colored paper.

Rather than waste the paper, I pulled out my WOW Oyster embossing powder and covered the Versa Mark with it. It was perfect to give just a little bit of color while hopefully retaining the CAS look.

Since I embossed the background, I stuck to that technique with all the other stamping too. So everything here is stamped with Versa Mark and then heat embossed.

My complete supply list is:

  • Speckletone Oatmeal Card Stock
  • Versa Mark Ink
  • WOW Embossing Powder in Oyster
  • Green, Brown and Bronze Embossing Powder from Michaels Variety Pack
  • Stampin' Up! Tropical Chic Stamps and Dies
  • Stampin' Up! Hardwood Background Stamp
  • Papertrey Sentiment
  • Stampin' Up! Cinnamon Cider Card Stock
  • Simon Says Stamp Off White Embossing Powder

I felt a little weird about putting "sending hugs" on a guy card, but the size fits (does anyone else do that-use a sentiment based on size rather than what it says?). Anyway, I thought the font was masculine and well, guys need hugs too!

I also thought that I'd mention that this card got hubby's approval for a nice guy card. That always makes me feel good! I think the only thing I wished I had done differently was to put a band under the lines going across the card. Still, it's a card that I really think a guy will like.

Thanks so much to everyone over at Cardz 4 Guyz for another great challenge, and thanks for stopping by my blog today!

Saturday, July 1, 2023

Elvis Presley's Church & Childhood Home

Graceland is amazing, for sure. But what touched me the most about our visit to Memphis wasn't the glitz and glamour of his glory days there, but his humble beginnings. I got to visit this firsthand as I toured his childhood home and church.

This is his childhood home. It's called a shotgun house because apparently you can shoot a
shotgun in one window and the pellets would go out the other-it's that narrow.

First of all, the church is simply amazing! It's the original chapel that he worshipped in when he was young. It's a small, wooden Assembly of God church. The attraction that you go to now is so well done.

I loves seeing his Bible with his
name engraved on it!
You're able to actually sit in a pew, and then the lights dim and a surround movie begins to play on 3 walls. It's a movie that's shot in church, but back in the 1930's or 40's. There's a preacher, people in the congregation, and little Elvis up on stage singing. 

It's a fairly short show, about 10 minutes or so. But for me, this alone was worth a drive over to Tupelo. I just love it when entertainers get their starts in church!

Faith is the most important thing in my life. And no matter how much fame or fortune you aquire, it's really God and His presence that matters, not only in this life but the next.

Faith must have been important to Elvis as well, for many of his Grammys were won for his gospel songs, which are still beloved to this day.

The actual church where young Elvis attended. During the "show" here, the lights dim and the walls become movie screens with scenes featuring Elvis as a boy playing music with others in the church. The experience is truly transforming!

If you’re ever near Memphis, and especially if faith is important to you, be sure to check out Elvis’ childhood home and church. You won’t be disappointed!

Manatee Village Historical Park

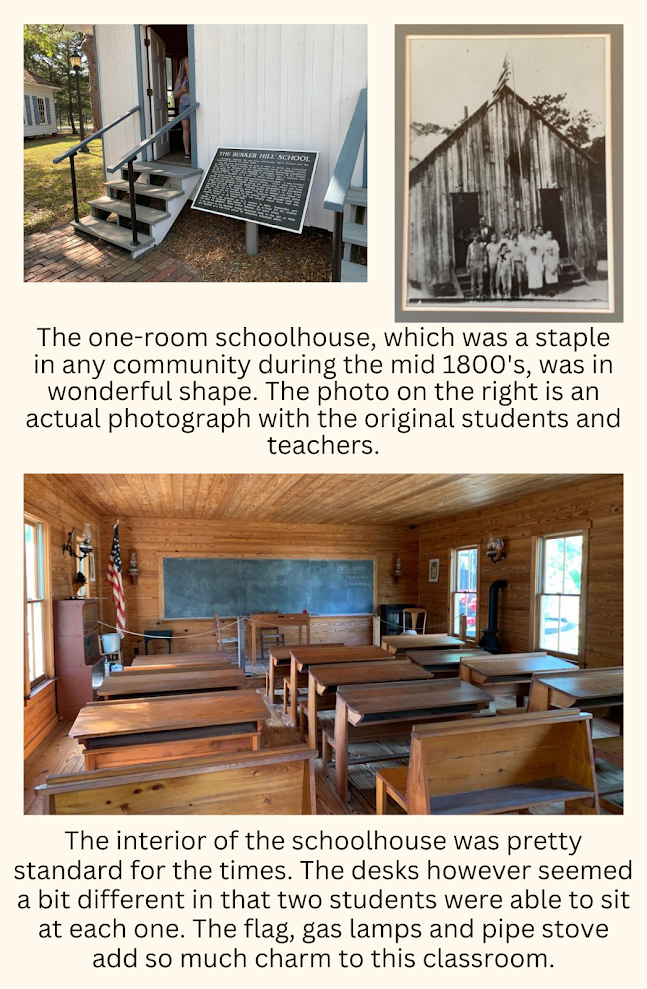
Manatee Village Historical Park is a group of several original buildings that were built in the 1800's in the area that is now called Manatee County, Florida. Back when this area was first settled, it was actually part of Hillsborough County.

The park includes a home, church, school, courthouse, boathouse and general store, plus a few extra buildings. We went on a weekday when there weren't any special events planned. To my surprise, all the buildings, except the barns, were open for self-guided tours. It was thrilling to step back in time as we entered each of these structures.

Each of the following structures is located within the historical park:

The Stephens Home

While just about every aspect of this village is amazing, the one thing that stood out to me was the architecture. The picture on the right was taken in the hallway of the Stephens home. Notice how there are two large white doors that are open. That was to let the breeze circulate throughout the house, yet they could be closed when the weather was cold, or to keep out animals at night when they were sleeping. 

The Church


The Schoolhouse


As with so many historic villages, there’s so much more to see and experience, not just here at Manatee, but in any historical village. If there’s one near you, or near where you’re going, consider stopping. Many places have taken local historic buildings and moved them all together to preserve the area for future generations to learn about. I love it when my tax money goes to fund something like this. And if you visit, I'd love to hear about where it was and how you liked it. Perhaps I'll get to visit there someday too!


Christmas BINGO Challenge #2 (July/August 2023)

This time over at Christmas BINGO Challenges we have some really fun choices on our Bingo Card! If you're new to our challenge blog, the rules are that you have to go up and down only under one of the five BINGO letters, and you have to use at least three items in the column.

I chose the "B" column and used all four items: a digital image, buttons, gingham and blue.

Making this card was so much fun! I love stamping, but I also love digital images. So when I saw this choice I knew I wanted to incorporate something digital. I just love how artistic they are, and they're quite inexpensive too. I got this one on sale for just $2.70 over at Etsy. The other nice thing about digital images is that you can resize them as big or as small as you want.

My complete supply list is:

  • Stampin' Up! Blueberry Bushel Card Stock
  • Etsy Digital Images
  • Stampin' Up! Peace & Joy Stamp Set
  • My Favorite Things Gingham Paper
  • Misc. Blue Buttons

Thanks so much for stopping by here, and if you haven't visited us over at Christmas Bingo Challenges, be sure to. We'd love to have you play along with us. This year is half over already and Christmas will be here before we know it!