Saturday, October 28, 2023

Comparing Reds Christmas Card

This actually wasn't supposed to be a card. I was comparing red inks because I am virtually out of Stampin' Up!'s Poppy Parade. I have the stamp pad, but for some reason I just never ordered a reinker. I was hoping to make it until January's Sale-A-Bration to place an order, but I don't know if I can make it through Christmas without my beloved Poppy Parade ink!

I thought that maybe my Memento Love Letter Ink could replace the Poppy Parade, at least for a little while. So I stamped three Poinsettias, one in Poppy Parade, one in Real Red and on in Love Letter. I came to the conclusion that there's nothing like Poppy Parade, and yes, I need to place an order before Christmas!

Of the three poinsettias, the one on the bottom is Poppy Parade; the very top is Real Red and the one in the middle left is Love Letter. I see the differences, but many wouldn't, especially between the top two.

After I made the flowers, I realized my Garden Green reinker was low, so I checked the stamp pad using these petals. When I looked down at everything I realize that I should make a card. The two small pieces of red patterned paper were that size when I found them in my stash box. And the "merry" sentiment was cut from a piece of sticker paper backed card stock that I already had. 

Here's my complete supply list:

  • Stampin' Up! Watercolor Winter Stamp Set
  • SU! Petal Potpourri Stamp Set
  • Gold Stickles
  • Expressions Thinlit Die
  • SU Garden Green Ink
  • SU! Real Red Ink
  • SU! Poppy Parade Ink
  • Memento Love Letter Ink
  • Green Stripe Paper from Echo Park
  • Red Patterned Paper from my Stash

So this card seemed to make itself with bits and pieces from lots of my stamp supplies, and I'm glad it did! I just love the creative process that can make something so cute out of little bits and pieces ot things-one reason I love making my own cards!

Thanks for stopping by to see my little piece of work this time!

Friday, October 27, 2023

Modern Wedding Card

Tomorrow we're going to the wedding of the daughter of my second grade best friend. She's in her young 30's, and I wanted to make a wedding card that reflected that generation, which seems so very different from my own time.

Her wedding invitation is a gorgeous array of brightly colored flowers. Back in my day, we had invitations that were embossed, and there were only about 10 different colors to choose from. I didn't want to bring a stuffy card so I set out to make something really different.

I began with the Stampin' Up! set called Splendid Thoughts because it had a wedding sentiment included. I also used the coordinating dies called Splendid Stems. My ink and colored card stock is Parakeet Party from Stampin' Up! and the flowers are colored with a Y02 Copic. All the papers including the gold leaves are from big box craft stores.

It' a fun card but I'm not really sure it's what I was striving for, but it's 11:30 at night and I just have to go with it. Tomorrow's a big day, but when I get more time I really hope to be able to play around with this set a little more. There are so many possibilities with this combo.

Thanks so much for stopping by my blog today!

Wednesday, October 25, 2023

Retro Rubber Challenge #218

I had so much fun with this challenge! First of all, I love gingham. Back in the late 70's when I was in high school, I worked at Cloth World. We had two tables full of gingham in three different sizes: mini, regular and extra large. And the colors were amazing too. And I remember those old tablecloths that were usually red or blue. Gingham was big back in the day. I loved it then and still do! If you're as crazy for gingham as I am, you may find this article on The History of Gingham interesting.

Anyway, when I saw Retro Rubber's Challenge #218 (rrcb218) I fell in love. The theme is Fall Picnics. How fun is that! And I really ran with the picture, incorporating most of the elements in my card. I couldn't find a small apple stamp that would fit the size, so I had to let that go. But I got all five colors in: yellow, green, brown, blue and white. And of course, my stamp is older than one year!

My complete supply list is:

  • Stampin' Up! Vibrant Vases (2019)
  • SU! Soft Suede Ink
  • My Favorite Things Tiny Check Brights
  • SU! Daffodil Delight Ink
  • Copics Y35, Y38, YR23, Y02, YG13
  • Memento New Sprout Ink
  • SU! Kite Delight (Sun & Sentiment)
  • Lawn Fawn Background Paper

It was a lot of fun making this card. I'm so grateful for everyone over at Retro Rubber for sparking my creativity. I would have never made this card without their inspiration! Be sure to check out their fun challenge blog if you get a chance, and thanks for stopping by today!

Word Art Wednesday Guest Designer - Kat Scrappiness


Well I'm just feeling so blessed because when you're a guest designer over at Word Art Wednesday you get to participate twice in one month! This is my second entry for October.

Normally I make my cards  using their wonderful scriptures, but this time I went with a Thanksgiving card using supplies from their sponsor,  Kat Scrappiness. I've heard of them a lot but never bought any of their products until now. I wanted to show my love and support for their generosity (okay, I wanted to buy some more craft supplies too), so I picked up a few things.

Click the pic for a direct link to
this product.
LOVE, LOVE LOVE my new products! All their stuff is so cool, but I wanted to showcase one super product and that is their A2 Full Front Shaker Pockets. They're also available in slimline. 

I don't make a lot of shaker cards because, well they can be a bit tedious. But not with these guys! All you have to do is:

  1. Cut a piece of card stock or patterned paper a bit smaller than A2. (I cut mine about 1/8" smaller).
  2. Remove the protective film from the front of the plastic.
  3. Fold 3 edges back and peel the tape off and adhere.
  4. Fill the top (with the tape still on) with any shaker material.
  5. Peel tape off the 4th edge and seal.
  6. Mount it on any card stock and viola!

Before you start, decide if you want your stamping or die cutting to be on the inside or outside of the shaker window. I chose to put my die cutting on the outside to make it stand out a bit more, but I'm looking forward to trying it with the stamping on the inside too. From there it's so easy. 

The shaker window is a perfect A2 size, but I thought it would make more of a splash if I mounted it on an A7 card front. This gave a little more room for some patterned paper too.

Oh my goodness, how precious is
this verse that reminds us that he
hears us! I must use this on a card
very soon. Someone will be so
encouraged by this!
This card will be going to my daughter who's away at grad school and won't be home for Thanksgiving. I miss her so much, but am looking forward to a wonderful Christmas with her!

My complete supply list for this card is:

  • Kat Scrappiness Shaker Card Fronts
  • Kat Scrappiness Autumn Foliage Dies
  • Kat Scrappiness Happy Thanksgiving Dies
  • Stampin' Up! Early Espresso Card Stock
  • SU! Delightful Dijon Card Stock & Ink
  • SU! Tangerine Tango Card Stock & Ink
  • SU! Cajun Craze Card Stock & Ink
  • SU! Old Olive Card Stock & Ink
  • Gold Paper from Michaels
  • Plaid Paper from Paper Rose
  • Gold Sequins (from my stash)
  • Gold Rope from Stampin' Up!

I really had so much fun with my little Kat Scrappiness haul. It's perfect for autumn and I know I'll get a lot of use out of all my products. I especially love the Happy Thanksgiving Die Set because it can be such an overlooked holiday in the shadow of Christmas. But I'm sure that there are a lot of lonely people out there who would love to get a Thanksgiving card too.

If you'd like to participate in this challenge and would like to include a Bible verse on your card, feel free to use this one above from Word Art Wednesday and enter their challenge. You don't have to use this scripture either! Just come on over and play along with us!

My most generous thanks to Karen and everyone over at Word Art Wednesday for giving me this great opportunity to participate in their challenge!

Just a note, I wasn't paid to review these products and they weren't given to me for free. This is a totally unbiased review of these products!

Tuesday, October 24, 2023

1891 Postcard Upcycle for Time Out Challenges


Oh my goodness, this one was so fun! I just love vintage things. My mom and I used to have an antique booth to buy for, but we no longer do. Yet I still find myself shopping for relics of yesteryear.

I paid $5.00 for this pile of old mail!
I'm glad I got to put it to good use today!
One of my latest purchases was a handful of old letters, mostly envelopes really, from Michigan. The postcard featured on this card goes back to 1891. I used the original postcard on the card, but cut a hole out so the recipient can read the other side.

It's a perfect card for Time Out Challenges #249, as their theme this time is Vintage! 

Here's my complete supply list:

  • Vintage 1891 Postcard
  • Speckletone True White Card Stock
  • Speckletone Oatmeal Card Stock
  • Stampin' Up! Dapper Dad Stamp Set
  • SU! Sahara Sand Ink
  • SU! Old Olive Ink
  • SU! Pear Pizzazz Ink
  • SU! Basic Grey Ink
  • Washi Tape from Mark's Fantastical Sales
  • Sentiment Hero Arts
  • SU! Christmas Season Stamp Set (Leaves)
  • October Afternoon (perfect timing to use this!) patterned paper

A few of things that I did a little differently on this card:

First, I made it into a 5 x 7 because I needed extra space to put the postcard and the stamps.

Second, normally I would have loved some brads, but I just stopped by the post office last week to see if extra postage was needed to mail a particular card that had thick rhinestones on it. She said not really, BUT she  used to work and the mail sorting room and that bumpy cards would frequently get ripped in the machines. I bought some non-machineable stamps, but I don't want to take any chances with this one. Instead, I added stamped leaves instead of brads.

I also cut a hole in the card (picture below). Hopefully the person I send it to will think it's just as cool as I do. It actually says that the man whom it was written for was recovering! Good news!

I also had to resort to using washi tape around the edges because the Tombow glue leaked through a little and it dries tacky to the touch. Not good on any card, but especially not on a vintage one.

I've included a couple more pictures of how I did this.

I decided the placement of each of the objects first.
This is the inside of the card where you can still read most of the original writing.

I marked the corners of the postcard, then drew a box
just a little bit smaller and cut it out.
I'm hoping that there's a special older gentleman out there somewhere who will love this card as much as I do. 

And a very special thank you to everyone over at Time Out Challenges for encouraging me to get this card made just before this challenge ended. I'm so glad to have your inspiration today!

Saturday, October 21, 2023

Try Stampin' On Tuesday Challenge #628

Today's card was made just for Try Stampin' On Tuesday's challenge #628. (TSOT 628) . It’s been a while since I’ve been over there and I’m happy to be getting back to their challenges.

This time it's a sketch and inspiration challenge. You can go with just the inspiration, just the sketch, or both. I chose both. Although looking at the card now, I should have tried my hand at some of the unusual color pumpkins. But the traditional orange are always a hit.

Here’s my complete supply list:

  • Close To My Heart's Autumn Blessings
  • Memento Espresso Truffle Ink
  • Copics YR15, YR07 and YG63
  • Spellbinders Circle Dies
  • Stampin' Up! Pear Pizzazz Card Stock
  • SU! Early Espresso Card Stock
  • SU! Pumpkin Pie Card Stock
  • Pink & Main Cozy Critters Patterned Paper

Me at our pumpkin patch earlier this week!
This was a perfect card for today because tonight I'm off to our church's annual pumpkin patch to help sell pumpkins for a couple of hours. It's such a fun activity each year, and getting to know others during that time is such a plus too.

Thanks to everyone over at Try Stampin' on Tuesday for a fun challenge and thanks for stopping by my blog today. Have a Happy Fall!

Friday, October 20, 2023

Monstrous Birthday Greetings

What I love most about Halloween are the little kids that come around trick or treating. I loved it when my kids were little, and even though we're empty nesters now (at least for the time being) I still pass out candy. Our neighborhood has a carnival right down the street, and afterwards all the kids come by looking for candy. Most years we have around 300 kids. I can't wait!

And this little stamp set from CTMH reminds me so much of that night. It's a really fun set that also includes candy, but I didn't feel I had enough room on the card for that, so the little monsters will have to stand alone.

This card is going into the following challenges: NBUS, as this is the first time I'm using this set, and Shopping Our Stash, whose theme is Franken-Card.

My complete supply list is:

  • CTMH Monstrous Halloween Stamps & Dies
  • Stampin' Up! Parakeet Party Ink
  • SU! Gorgeous Grape Ink & Card Stock
  • SU! Poppy Parade Ink
  • Memento Teal Zeal Ink
  • Memento Tangerine Tango Ink
  • Yellow Star Background Paper
  • Doodlebug Designs Striped Paper
  • Copics R32 & Y15
These cards (I actually made two the same) are going to two people who have Halloween birthdays. It's so fun to combine those things, especially when the stamps say just the right thing like here.

Thanks so much to everyone over at those challenge blogs who work so hard putting together these challenges for us, and thanks to you for stopping by today! Have a safe and fun Halloween! 

Tuesday, October 17, 2023

Hey Pumpkin Digital Freebie

I love all things pumpkin spice, but have never had a drink as cute as these two here! 

This card is made with a simple freebie that I've created and posted below. It's so easy to just print it out and mount it on your choice of background for a really cute and quick card. My background is Stampin' Up!'s Pumpkin Pie Card Stock and Patterned Paper from Little Critters by Pink & Main. Tied with a jute bow and it's ready to cheer someone up this fall!

Here's the free digi. As always:

  1. Snag it to your desktop or photos.
  2. Put it in a Word or Page Document.
  3. Resize it to the size card you want to make.
  4. Print it out, either at home or at a copy center. 
This one has a transparent background and mine is professionally printed at the copy shop (FedEx) using toner ink for a crisp image. If you print it on off white or colored paper, the color of the paper will show through on this one. 

I hope you enjoy the freebie! Thanks for stopping by my blog today and have a wonderful day!

Happy Thanksgiving Latte

Earlier this week I made a card for three challenges. It featured two cups of pumpkin spice drinks. When I stamped the cups, I made three different ones because I didn't know which ones I would like for that card. As it turns out, this one was leftover. Not wanting it to go to waste, I made this card. Even the sentiment is leftover from another card I made. 

Here's my complete supply list:

  • Pink & Main "I Love You A Latte" Stamps
  • Pink & Main Little Critters Wood PaperStampin' Up! Pumpkin Pie Card Stock
  • SU! Early Espresso Card Stock
  • SU! Cinnamon Cider Card Stock
  • Copic E30, YR15, YR07, E97, E19, YG61 and YG63
  • Orange Enamel Dots (from my stash)

I love it when I can take scraps and turn them into something cute like I did here.

Thanks for stopping by my blog today! Stay warm and enjoy the fall.

Saturday, October 14, 2023

Birthday Butterflies

I made this card a few days ago because I needed something to color while watching TV in the evening. This is one of my favorite sets for doing that. The funny thing is, I was hoping for more of a purple effect and thought I chose my Copics appropriately, but somehow I got this blue. Either way, I do like the card, which is a little bigger than my usual A2 cards.

It's kind of ironic how similar it looks compared to the card I just posted yesterday for a challenge. I didn't plan it that way. Perhaps I'm just in a double image mood this week!

Here's my complete supply list:

  • Stampin' Up!'s Beautiful Day Stamp Set
  • BoBunny Back to Basics Paper
  • SU! Boho Blue Card Stock
  • SU! Gorgeous Grape Card Stock & Ink
  • SU! Rich Razzleberry Ink
  • Copics RV09, R85, R20, BV13, B21, B23, B52

I'm getting strong 4th of July vibes from this birthday card, so I think I'll stash it away until then. Thanks for stopping by my blog today!

Friday, October 13, 2023

I Love Someone A Latte!

I'm in the middle of loving pumpkin spice season and I'm so glad to find some great challenges to link up to today! What got me started was a sketch over at Freshly Made Sketches #607 (fms607) and Retro Rubber's #217 Challenge (rrcb217) has an anything goes this round (how easy is that!?) and over at The Four Seasons Challenge their theme fall of course. So much autumn fun everywhere!

I started with Pink & Main's "I Love You A Latte" stamp set. I bought it this time last year, so I'm sure it's at least a year old. I noticed that they have a new set that just came out this year called "Thanks A Latte," but this one is different. Just wanted to clarify so I'd be good over at Retro Rubber where your stamp needs to be at least a year old.

Next I used Pink & Main's Cozy Critters Patterned Paper. The card stock is from Stampin' Up in Pear Pizzazz, Early Espresso and Pumpkin Pie. The sentiment is stamped on Speckletone Oatmeal Card Stock. Finishing it off are the brads from Recollections (Michaels). The dies in the middle of the card are from the Ornate Labels Dies Set from Sizzix.

The cups are stamped on white card stock with Memento Espresso Truffle Ink and colored with Copics E30, YR15, YR07, E97, E19, YG61 and YG63.

I so appreciate these three challenges for inspiring me once again to create something really fun, festive and for fall. I plan on sending this card to my daughter tomorrow. She's 600 miles away and I really love (and miss) her a latte!

Thanks so much for stopping by today!

Wednesday, October 11, 2023

Appreciating Our Pastor (& Staff)

I guess you could say that I'm the card lady at church. I often bring in my lucite rack and let people take any cards they may need. I love sharing that way.

Well October is Pastor Appreciation Month, and I was asked to make cards for not only our Pastor, but the secretary, custodian and our hired nursery care worker.

It was quite a task, and I relied on digital images to pull all these off in a short period of time.

Starting with our Senior Pastor, I came up with this card. This looks so much like our little church with it's old-fashioned wooden pews and a stack of hymnals and Bibles. Although now we're more likely to see his iPad on the pew as he controls the sound and communicates with others in the sanctuary. Still, our church does look like this, and I was happy to have been able to create this card for him.

In addition to the digital image, I used
different colors of card stock and embossed the blue. After it's all mounted, I tied it up with a red piece of twine. I'm hoping the bow isn't too feminine.

This card is a little larger than my usual A2's, coming in at just around 5" x 7" because I thought we may all sign it and need the extra space.

I also had to make a card for our custodian, whom I don't know at all. I played it safe with a red, white, yellow and blue card. Guy cards can be so hard for me sometimes! I hope he likes it! Anyway, the important thing is that he knows that we appreciate him.

Lastly, we do hire a nursery helper and I made her card with little animals on it, kind of a representation of the little ones we have in the nursery. I hope she likes hers too.

If you happen to need any of these, feel free to use the free digital images provided below. But no matter what kind of card you give, making sure our pastor's and staff know we appreciate them is so important, especially this time of year!

To see the church secretary's card and get that free digi, click HERE. It's really pretty and can be used for any kind of feminine thank you card. It's perfect if you're looking for something in lavender.

Here's are the free digis. As always:

  1. Snag it to your desktop or photos.
  2. Put it in a Word or Page Document.
  3. Resize it to the size card you want to make.
  4. Print it out, either at home or at a copy center. 

I hope you enjoy these freebies, and thanks so much for stopping by my blog today! 


Word Art Wednesday Guest Designer - Newton's Nook

I am really excited today! I'm guest designing for the first time ever over at Word Art Wednesday! I love their site and how they honor God in all they do. 

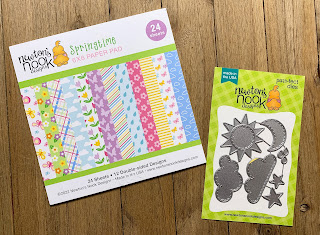
Newton's Nook is the sponsor for the challenge this time and I just had to buy a couple of their things for the occasion. They have lots of great stuff over at newtonsnook.com, but there were two things in particular that I just had to have.

The first is the Sky Scene Builder Die Set. It's so cute and includes a sun, two clouds, a moon, two stars and three raindrops. I've been wanting a sun die for some time, but to get these others too is really great.

Two new toys from Newton's Nook!
Another thing I loved over at Newton's Nook was the adorable paper pack called Springtime. Two things I noticed right away about their paper is that it's quite thick, almost like card stock. And it's a bit shiny. Not too shiny, but it has a really nice feel to it. I'm a little off season with this one, but I just fell in love with the bright colors and elements that matched the die set. I'm so glad to have this in my collection.

A cute note: See the butterfly on the front of this card? It's a fussy cut-out from one of the sheets of paper
from the pack. Because the paper is thick, it was really easy to cut and glue him down. This paper pack is so versatile!

My complete supply list is:

Here's the beautiful scripture from this time from Word Art Wednesday. You can use it in your design if you want to, but you don't have to to participate. Be sure to check out their wonderful blog! And thank you so much Karen and everyone over there for giving me the honor of guest designer this month!

Disclaimer: I bought all these products with my own money and was not compensated in any way by Newton's Nook or any other company.

Tuesday, October 10, 2023

Lavender Thank You Digital Freebie

This card was actually made for Pastor Appreciation Day, or in this case, Church Secretary Appreciation Day. Our church is really good about remembering not just our pastor but everyone on the staff.

It started with a digital image (below) and I embellished it with washi tape, patterned paper from Newton's Nook, twine from Michaels and a doily and floral rhinestones from Stampin' Up!

It's all set on two colors of purple card stock that came in a variety pack from Michaels. (This is such an economical way to buy card stock.) The colors aren't as varied as someplace like Stampin' Up!, but if it's price you're looking for be sure to check them out. I always buy the 110# paper for card bases. They sell a lot of 60# paper too, but it's quite flimsy. You can use it for a card base, but it's best for the liner or for decorating the front of a card.

What I loved about making these cards is that I didn't have to worry about the embellishments adding extra postage because they were going to be hand-delivered. I always love it when that happens and I go a little crazy with things. You'll even notice that there are floral rhinestones on the outside of the envelope. That would never survive the USPS!

This would be a perfect card for someone who you really appreciate, especially around Mother's Day. You can even print out the digital image and cut around the flowers and put your own Mother's Day sentiment on it.

Here's the free digi. As always:

  1. Snag it to your desktop or photos.
  2. Put it in a Word or Page Document.
  3. Resize it to the size card you want to make.
  4. Print it out, either at home or at a copy center. 

Tuesday, October 3, 2023

Retro Rubber Challenge 213

Some cards are so easy to make. A few taps here and there, some adhesive, and a beautiful card appears.

This card took a little more work. Perhaps it's my own fault. Masculine cards aren't something that I usually feel confident about making. Yet that's one of the categories I chose over at Retro Rubber's Tic-Tac-Toe Challenge this week.

We all need guy cards to send, and I thought that the first row across the top would be easy. All I needed was an animal, patterned paper and a masculine theme. It's a perfect combo for fall too!

Well, over an hour and five owls later, I came up with this card. I do actually like it, but it was a real challenge for me. But that's what I signed up for when I took this challenge, right!? 

Anyway my complete supply list is:

  • Woodware Owl Stamp (2018)
  • Gifted Patterned Paper (from an old paper pad)
  • Stampin’ Up! Wild Wheat Card Stock
  • SU! Soft Suede Card Stock & Ink
  • SU! Sahara Sand Card Stock
  • Speckletone True White Card Stock
  • Michaels Clear Embossing Powder
  • SU! Pear Pizzazz Ink
  • SU! Daffodil Delight Ink
  • SU! Birch Embossing Folder
  • Blender Brushes
  • Sentiment from Papertrey Ink

We go through a lot as card makers but it's worth it. I love the creative process, especially the fact that you don't always know what your finished product is going to look like when you first start.

The owls that didn't make the cut!
Like I said, I really do like this owl. He fits the masculine theme well and I think he'll make someone out there really happy. As for the owls that didn't make the cut, I may salvage some of them. And even when cards don't come out quite like we hoped, we're honing our skills that will help us make the process easier next time!

If I have time before this challenge ends, I may try to go back and shoot for the bottom row. Watercolor, circles and a die sound like such a good time! If you get a chance, grab your older stamps and head over to Retro Rubber any time for a lot of fun challenges!

And a big thanks to everyone over there at Retro Rubber for some great inspiration! I really appreciate and enjoy your challenges!

Monday, October 2, 2023

Autumn Wishes Digital Freebie

Today’s card is one that I make using a Digital Freebie in black and white, colored in with Copic Markers. I printed it out on my computer and trimmed it down. After coloring the pumpkin and leaves, I used a blending brush and blended, Stampin’ Up!’s Delightful Dijon ink around the edges.

It's mounted on generic black and white dotted paper, then Stampin' Up!'s Tangerine Tango card stock. The check paper is from The Paper Studio (Hobby Lobby) and the wood and words is a back/front paper called "Cutting Board" from Peebles.

I really like the how dark this one turned out. It looks so much like a fall night in a pumpkin patch. (I'm thinking about Charlie Brown right now! I love the Peanuts!)

Anyway, feel free to snag the freebie on the right. I put my info a little lower than usual, as I thought it would look in a circle cut too.

Here's the free digi. As always:

  1. Snag it to your desktop or photos.
  2. Put it in a Word or Page Document.
  3. Resize it to the size card you want to make.
  4. Print it out, either at home or at a copy center. 

Enjoy, and Happy Fall!

Sunday, October 1, 2023

Hello October Freebie!

Welcome October! This little freebie is just right for saying hi to someone this fall! 

The download is below, and added to that is some Stampin' Up! Paper in Pumpkin Pie, Crushed Curry and Cherry Cobbler. The yellow is embossed with a swirl design pattern called Swirls and Curls, also from Stampin' Up!

I love little cards like this that don't really say anything specific. It's just a little something to let someone know that you're thinking of them!

Here's the free digi. As always:

  1. Snag it to your desktop or photos.
  2. Put it in a Word or Page Document.
  3. Resize it to the size card you want to make.
  4. Print it out, either at home or at a copy center. 
I hope you enjoy the freebie! Thanks for stopping by my blog today and have a wonderful October!